Showing posts with label Kitchen. Show all posts

Wednesday, June 5, 2013

Flour/Butterless Peanut Butter Oatmeal Chocolate Chip Cookies

That title sure is a tasty mouthful! Sorry I'm a bit behind blogging this week. It's become quite a busy season and I'm sorry to not have more time to devote to my hobbies. Anyway, I hope that this day finds you peaceful and at ease in the Lord. I am seeing more and more how faithful He is to help me through the stress and anxieties of this transitioning season. I'm setting sail to the "real world" and saying good-bye to college life for good. I'm applying to teach, and it isn't exactly an easy task. However, the Lord is trustworthy and dependable. I know He will put me where He sees best.

Now to the cookies! I'm not playing around with you. These cookies are fo realzzz. No flour. No butter. (although I love butter...not as much as Miss Paula Dean, but still). Thanks to Tasty Kitchen Blog for the recipe!

Let's get started. You'll need only seven ingredients.

  Ingredients:
(Makes 16-20 cookies)

  • 2/3 cup Rolled Oats (I just used Old Fashioned Quaker Oats I had)
  • 1tsp Baking Soda
  • 1 cup creamy Peanut Butter
  • 2/3 cup Dark Brown Sugar
  • 2 Large Eggs
  • 1 1/2 tsp Vanilla Extract (I use Mexican Vanilla...it's in my blood ;) and tastes a million times better!)
  • 2/3 cup Chocolate Chips

Preheat oven to 350˚F.

In a small bowl, mix together oats and baking soda; set aside.

In the large bowl of an electric mixer, beat peanut butter, brown sugar, eggs and vanilla until smooth.


Mix in dry ingredients with a wooden spoon, then gently fold in chocolate chips. 
( I was in a hurry so I just chunked it all in together. But I would encourage just stirring in. :)


Scoop about 2-inch balls and place onto a cookie sheet 2 inches apart. The dough is pretty sticky, but I just used a tablespoon to scoop the dough and then another spoon to slide it out onto the tray.


Bake for 9-11 minutes and remove when the edges are barely turning golden brown. The cookies may look a little undercooked, but they will continue to cook once you remove them. Allow cookies to cool for 2 minutes on the tray and then transfer to wire rack to cool completely, or you can always transfer one to your mouth...


And there you have it! SO GOOD, RIGHT!?  


 Happy baking and many blessings!

Monday, January 21, 2013

Spaghetti Squash

Alright, so the cooking New Year's resolution is coming along! The next recipe I'll share is one that I LOVE. It has so many possibilities. And is SUPER easy. Like 10 minutes easy.

The first time I cooked this I freaked out because I had never eaten spaghetti squash and it is SO cool!  It is seriously like spaghetti, only it doesn't leave you feeling heavy and stuffed.

Ingredients: 
Spaghetti Squash
Olive Oil
Salt/Pepper

Sauce: 
1 24 oz. can of Organic Original Pasta Sauce
1 bay leaf
1 tsp thyme leaves
1 tsp ground oregano
1 tsp basil leaves
1/2 tsp nutmeg
3 Tbsp dry Italian seasoning


Directions:
Cut Spaghetti Squash in half, long ways. From stem top to bottom, and then scoop out the seeds.

Coat each half with olive oil and sprinkle with salt and peper. Place in microwave for 9 minutes, in 3 minute increments or until a fork easily pokes through. (If microwaves freak you out, turn upside down in a baking dish and bake until tender. It will take quite a bit longer, but you'll get the same results.)

While the squash is cooking I make the sauce. I pour a small can of Original Pasta sauce into a sauce pan, and then add all the above herbs. I prefer using fresh herbs, but dried ones are fine as well. They just won't give you the stronger flavor. Let it get to a boil and then turn off the heat.

Once the squash is tender, using a fork, scoop out the squash. It should easily come apart and be stringy like spaghetti. Crazy cool right?!?

You can either eat out of the squash itself, or you can scoop the spaghetti into a bowl. Top with sauce, and add any variety of vegetables.

So simple, so quick. You could even just go with canned sauce if you didn't have time to make your sauce. You can use meat sauce if you want a more  hearty meal, but as I stick to a plant-based diet, I love the lightness of this meal. I feel full after eating half of a half of the squash. It stores well also for leftovers.

Wish I had discovered this in college! Happy healthy eating!


Friday, July 15, 2011

Would You Rather? Strawberry Toaster Style

So one morning I came down to find my brother pulling out the Pillsbury dough boy from the freezer...you can only imagine my horror to find out that my brother was eating a frozen pastry! Pre-packaged...fro...fro..FROZEN!!!! Ugh I can barely say it! So I immediately challenged him to give real pastries for breakfast a try. I was intent upon finding a REAL strawberry toaster pastry recipe..and I didn't have to look far. The Baking Fairy sent Williams-Sonoma to my aid. I was flipping through one of the magazines (one of my favorite) and low and behold..."Strawberry Toaster Pastry Recipe"!!! Ta-dow!

And so here begins the exciting experiment. Would you rather eat a Pillsbury's Strawberry Toaster Strudel or a Real Strawberry Toaster Pastry?

I tweeked the Williams-Sonoma recipe with what I had in regards to the cookie cutter, and it worked out fabulously.  All the directions and details you need to know can be found on their website on the link above. 
So you first cut the dough into the shape of the pastries using the cookie cutter. Then cover half of the pieces with chosen jelly, and add fresh fruit. Then you dab the edges of the pastries with the egg mixture and press around the edges to help keep the filling snug inside.
 Continue to cook them as the directed.
Now for the icing. YUM. You can make whatever pretty designs your heart desires. : )
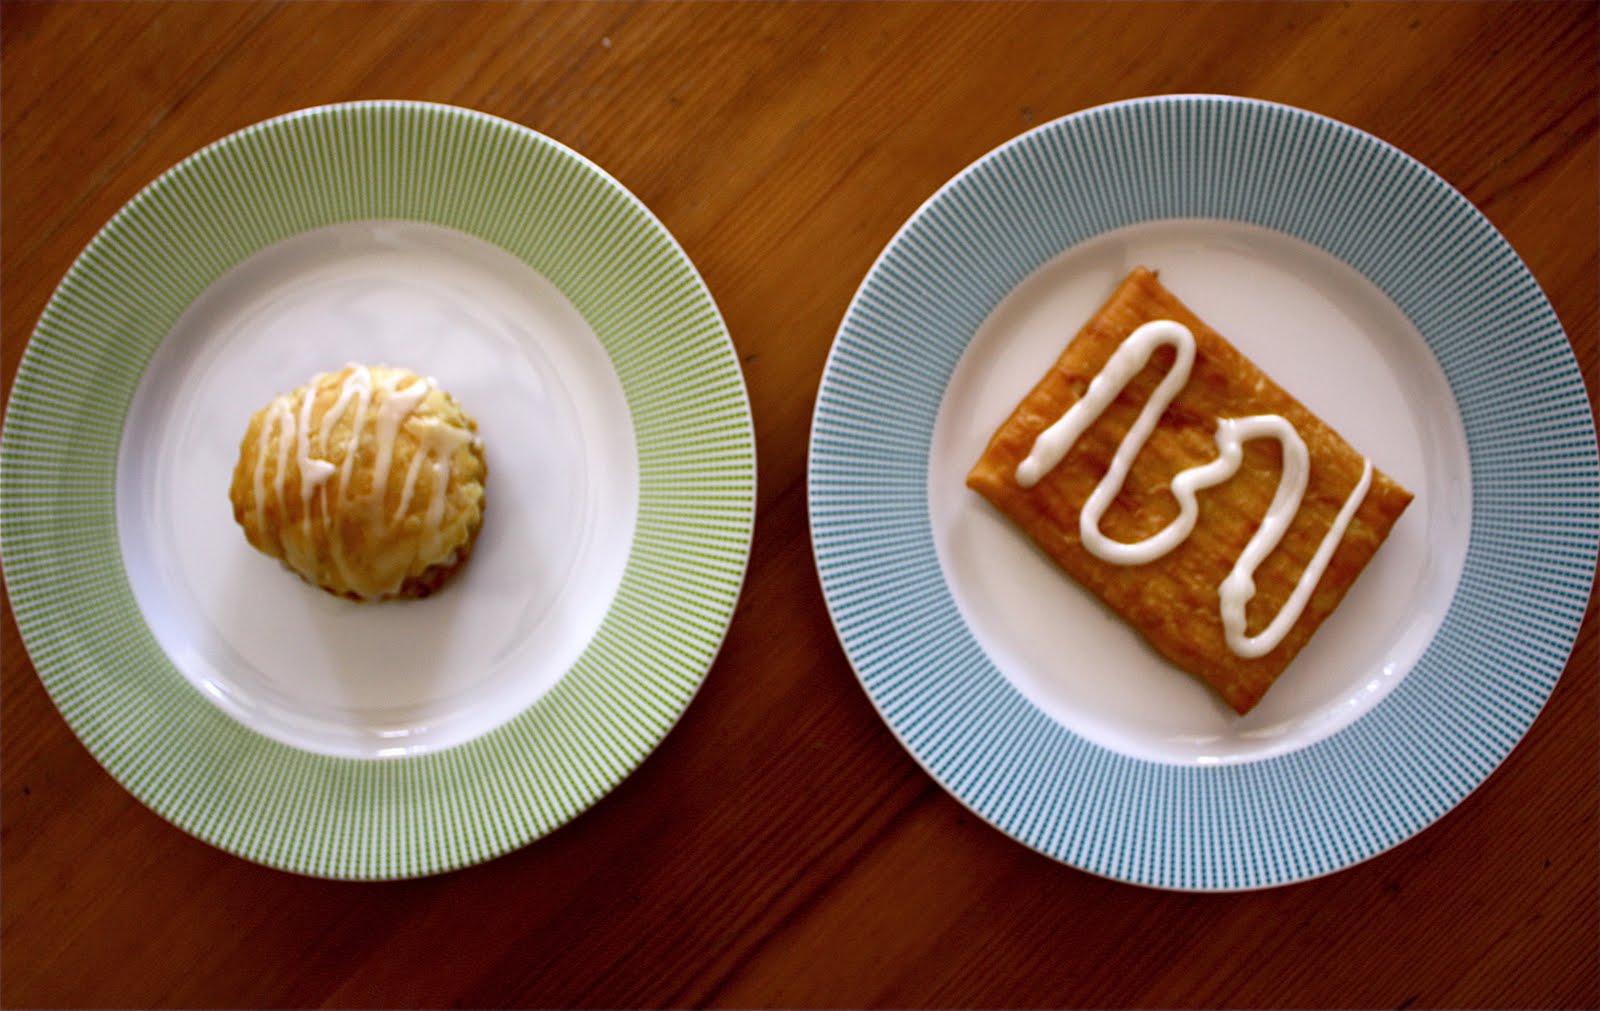
Then we come to the first snag on the Toaster Strudel side.  I pulled out the icing and found it in this "lovely" plastic container. Ew. I don't know about you, but which icing would you rather drizzle your pastry with? I'll go with the fresh one thanks.

Now for the finished products. I tried to make the Strudel icing look elegant...but using that little squeeze plastic bag was a fail. I guess I need practice with it. On the other hand...I don't think I'll find myself using that icing ever again. 

Now for the first bites! I first tried my homemade pastry. Ok YUM! Delectable and scrumptious were my first two thoughts. The flaky outer layer melts in your mouth and the icing gives the sweetest compliment to the strawberry filling. Now for the toaster strudel...

Um...I'll just let the pictures speak for themselves. 

So I don't know about you, but if my brother and I have learned anything from this, we both now know that frozen never beats the real deal. Not even close. Hope you enjoyed the experiment.
 Conclusion: I would so much rather have a REAL strawberry toaster pastry. 

P.S. I had to spit out the toaster strudel. I couldn't do it. It was just too much ick for my mouth.
So please, save your taste buds and your arteries from the horror of frozen baked goods. 
Really. Don't do it. It isn't worth it. ; )
Happy baking!

Wednesday, July 6, 2011

Delightful Dinnerware

So as I've mentioned before, I have a problem. It is a love affair with dinnerware.  There I said it. Phew. It's true. I would rather shop for my kitchen than my closet. And seeing how I don't have a kitchen of my own yet...well let's just say I'm running out of storage room. 
I've found alot of dinnerware that I love love love, and since I'm going public with this confession, well I thought I would try and get you to fall in love with dinnerware too. It really is fun!!☺
Gingham Mug 16 oz. $4.95 each
 So these little lovelies I just got this past weekend. I went to Crate and Barrel with my Pop, and well let's say I was a little too excited about my finds. My dad had a good laugh at me running around the store grabbing what I convinced myself I couldn't live without atleast one of.  And the best part about all of these pieces is that they are all under FIVE BUCKS! Yup. You read right. $5.  So if I were you, I would swing by and get some before they are all gone.
Radio Green/Teal Plate 8.25" $3.95 each

Triana Plate Blue 7.75" $4.95 Each
Another one of my new favorite places to look for dinnerware: West Elm. You may not be too familiar with this one, but it is an up and coming hot spot for home decor.
They also have some super cute mugs right now. These are their Modernist Mugs at $10 each. They are adorable and fun to use for tea time. 

Check out some of their other dinnerware also, like their matching Modernist Bowls,  only $8.

Alright, so now for some of the classics. If you have ever been to Anthropologie, you have probably seen these lovelies. And well, as you can see, I have more than I really need. But some are my sister's! So I'm not completely nuts!
These bowls are great basics, and the colors are absolutely delightful! They are called Latte Bowls  and online you can get a set of 6 for $30. They are about $5 each. They are porcelain and hold about 18 oz. The best part is that they are microwave and dishwasher safe, so they are a breeze to clean.
Latte Bowls
Latte Bowls

Mini Latte Bowls
And you can't forget the mini's! They are available in different colors seasonally, so you'll find different colors pretty often.T Mini Latte Bowls  come in a set of 8 for $20, which comes out to them being $2.50 each. They are super cute and hold about 3 oz.

Mini Latte Bowls

Target Summer Dinnerware

Ok, and finally, we can't rule out Target! These polka-dot glass cups came from Target last summer. Target has some great options when it comes to dinnerware, and their summer collections are always super cute. So go to your local Target and check out what they've got this summer! You might be pleasantly surprised!


 I hope you are starting to get a hinkering for dinnerware. Who says you have to have 8 of the same plates for dinner guests?!? Why not jazz it up some and everyone get a different plate! It gives your part some character and you can say goodbye to "Is this your plate or mine?"


Friday, June 10, 2011

PB&C Pretzels

Hi friends! Hope your summer is going splendidly! Today I needed a chocolate quick fix, and had seen a this idea earlier and thought I'd have a go at this little shindig. It is quick, easy and a scrumptious bite-size snack! These would be perfect for any party or to just simply keep around in a cookie jar! Ok so you're probably saying, "Alright already! Just tell us what these are and how to make them!" Ok, ok. These are Peanut Butter & Chocolate Pretzels!
In a small bowl mix together peanut butter, vanilla, and sugar. Just use your discretion when adding the vanilla and sugar. Use just enough vanilla to make the peanut butter smooth. And add as much or as little sugar as you want! Then melt some semi-sweet chocolate chips and while those are melting, make the PB and pretzel sandwiches. Finally dip the pretzel sandwiches in the chocolate. Place on wax paper or paper plate and put in freezer for 10-20 minutes. Bon appetite! 

Also, if you love colorful kitchen ware, West Elm has some fabulous plates, bowls, and coffee cups! You should check them out!