Showing posts with label Baking. Show all posts

Wednesday, June 5, 2013

Flour/Butterless Peanut Butter Oatmeal Chocolate Chip Cookies

That title sure is a tasty mouthful! Sorry I'm a bit behind blogging this week. It's become quite a busy season and I'm sorry to not have more time to devote to my hobbies. Anyway, I hope that this day finds you peaceful and at ease in the Lord. I am seeing more and more how faithful He is to help me through the stress and anxieties of this transitioning season. I'm setting sail to the "real world" and saying good-bye to college life for good. I'm applying to teach, and it isn't exactly an easy task. However, the Lord is trustworthy and dependable. I know He will put me where He sees best.

Now to the cookies! I'm not playing around with you. These cookies are fo realzzz. No flour. No butter. (although I love butter...not as much as Miss Paula Dean, but still). Thanks to Tasty Kitchen Blog for the recipe!

Let's get started. You'll need only seven ingredients.

  Ingredients:
(Makes 16-20 cookies)

  • 2/3 cup Rolled Oats (I just used Old Fashioned Quaker Oats I had)
  • 1tsp Baking Soda
  • 1 cup creamy Peanut Butter
  • 2/3 cup Dark Brown Sugar
  • 2 Large Eggs
  • 1 1/2 tsp Vanilla Extract (I use Mexican Vanilla...it's in my blood ;) and tastes a million times better!)
  • 2/3 cup Chocolate Chips

Preheat oven to 350˚F.

In a small bowl, mix together oats and baking soda; set aside.

In the large bowl of an electric mixer, beat peanut butter, brown sugar, eggs and vanilla until smooth.


Mix in dry ingredients with a wooden spoon, then gently fold in chocolate chips. 
( I was in a hurry so I just chunked it all in together. But I would encourage just stirring in. :)


Scoop about 2-inch balls and place onto a cookie sheet 2 inches apart. The dough is pretty sticky, but I just used a tablespoon to scoop the dough and then another spoon to slide it out onto the tray.


Bake for 9-11 minutes and remove when the edges are barely turning golden brown. The cookies may look a little undercooked, but they will continue to cook once you remove them. Allow cookies to cool for 2 minutes on the tray and then transfer to wire rack to cool completely, or you can always transfer one to your mouth...


And there you have it! SO GOOD, RIGHT!?  


 Happy baking and many blessings!

Monday, April 22, 2013

Sugar Cookie Squares

Happy Earth Day sweet friends!

I love any reason to celebrate because we all know that gives us an excuse to bake something! Then again, you never really need a reason to bake. ;)

I've been eyeing some little sweeties on Pinterest and decided to take a whirl at it finally. And being Earth Day and all I added a little green! Gotta love being a little organic. I think they turned out great! My only change would be to use a larger pan. They were a bit too thick for me, but scrumptious none the less!

Thanks to Make Ahead Meals for Busy Moms for the recipe!


Sugar Cookie Squares

From:  Cooking Classy
Yields 24 squares
Ingredients:
1/2 cup butter, softened
1 cup granulated sugar
1 egg
1 egg white
1 Tbsp sour cream
1 tsp vanilla extract
2 1/2 cups all-purpose flour
1/2 tsp baking powder
1/2 tsp salt
1 recipe vanilla frosting, recipe follows

Preheat oven to 375 degrees. Butter a 13″ x 9″ baking dish, set aside. In a mixing bowl combine flour, baking powder and salt, set aside. In the bowl of an electric mixer, whip together butter and sugar until pale and fluffy about 3-4 minutes. Stir in egg and egg white. Add sour cream and vanilla and mix until blended. Slowly add dry mixture and stir until well combine. With buttered hands, gently press (so gently almost patting) mixture into buttered baking dish. Bake 16 – 19 minutes until toothpick inserted into the center comes out clean and edges are lightly golden. Cool completely, then frost and cut into squares.

Vanilla Frosting


Ingredients:
1/4 cup unsalted butter, softened
2 cups powdered sugar
2-3 Tbsp half and half
1 tsp vanilla
Pinch of salt
Several drop food coloring (optional)

In a mixing bowl, with an electric mixer, whip together butter and powdered sugar and half and half until fluffy. Stir in vanilla and salt. Add in food optional food coloring and mix until well blended.


Eat up! Happy baking!

Sunday, January 27, 2013

Banana Chocolate Chip Muffin

Are you ready to give yourself the most delicious treat ever? Because I have just discovered my new favorite muffin. And they are so easy to make as well! They are wonderfully moist and the perfect density. I ate 5 the first day (oops! ;)

Ingredients:
2 cups unbleached all-purpose flour
1 1/2 tsp baking soda
1/2 tsp salt
1 cup granulated sugar
1/3 cup canola oil
4 very ripe bananas, mashed
1/4 cup water
1 tsp vanilla extract
1 cup semi-sweet chocolate chips


Preheat oven to 350˚F. Lightly grease your muffin tins, or line with baking cups.

In a medium bowl, mix the flour, salt, and baking soda.

In a large bowl, beat the sugar and the oil. Mash bananas well and add to sugar mixture with chocolate chips. Stir in the water and vanilla until incorporated. Add flour mixture a little at a time and stir until just incorporated.

Any excuse to use these lovelies 
Fill muffin cups evenly and bake about 20 minutes, until they are a light golden brown. The time depends on your oven and how much you fill the muffin cups. But a good rule of thumb with muffins and cupcakes is to stick a toothpick in the middle of the cupcakes/muffins and when ready the toothpick will come out cleanly.


Viola! This goes to show that anything is better with a little chocolate. ;)
Happy Baking!


*Hint* 
For muffins or cupcakes to rise follow this great cooking tip from Kelly Neil! 
Credit to Kelly Neil
*Thanks to Merry Merzville for sharing this great recipe!

Thursday, December 27, 2012

Cupcake Stencils

Last year as I walked the lovely aisles of Crate and Barrel I came upon... cupcake stencils. !!!!!

You can only imagine my absolute joy. I had never even thought to make stencils, and yet lo and behold Crate and Barrel has come up with some for every season. 


In love.
I bought the Christmas ones last year after Christmas, but I finally got to put them to use this year!  

They are so adorable and cute, but they do not work well with sprinkles (look below at lemon cookie decorations). I had to use cinnamon (which can be a little strong) to get the image clearly on the cupcake and cookies.  They were absolutely beautiful though when they did work, as on the Snickerdoodle Cupcakes. 


wah wah...

Overall I think they are a super cute idea. I just need to figure out how to better use them. :)

Hope you have had a very Merry Christmas!

Cookies and Christmas

Hello friends!

So let's get right to it! Cookie time! My brother came home from college and asked...well demanded...some gingerbread men cookies. This caught me quite off guard because never have I had this requested from anyone in my family...but you can bet I was on top of it!

I loved this recipe and will now share it with you! Also, I found this delicious recipe for sugar cookies which were also requested this happy holiday season. So here are the two recipes for the cookies and also my icing recipe.


Sugar Cookies
I recruited my younger brothers to decorate ;)
Ingredients
1 cup real butter (no substitutions!) at room temperature
1 cup sugar
1 egg (make sure to use a large or extra large egg)
1 1/2 teaspoon almond extract (or other flavor of your choice, like vanilla)
3 C flour, lightly spooned into measuring cups and leveled (don’t scoop it!)
1 1/2 teaspoon baking powder
1/2 teaspoon salt


Directions
Cream butter and sugar until light and fluffy- about 2 minutes. Add in egg and extract and mix to incorporate.
In a separate bowl combine flour, baking powder and salt.  A very important note: It’s important to correctly measure your flour or you will end up with a dry, crumbly dough. Never, ever use your measuring cup to scoop up the flour.  Use a regular sized spoon and spoon the flour into the cup and then level it off with a knife.
 Slowly add the flour mixture to the butter mixture and mix until completely combined.
Chill the dough in the fridge for about an hour, or use this great tip to make things easier:
When your dough is made, instead of putting it in the fridge, immediately roll  between 2 sheets of waxed or parchment paper and then place on a flat surface in the fridge.  Chill for about 20-30 minutes and then start cutting it out.  This way it chills faster and the bonus is that you don’t need to add extra flour to roll it out.  If you don’t use this tip, proceed as follows:
When you’re ready to roll out dough lightly sprinkle flour onto your work surface and roll out dough with a rolling pin.

Bake at 350 for 8-12 minutes. The baking time really depends on how you like them. If you like themreally and slightly chewy, about 8-9 minutes does it. If you like them slightly crisp and buttery, then go for 10-12.

Gingerbread Men Cookies
Ingredients
Little Bandit lost his legs as punishment for his crimes
  • 6 cups all-purpose flour
  • 1 teaspoon baking soda
  • 1/2 teaspoon baking powder
  • 1 cup (2 sticks) unsalted butter
  • 1 cup Truvia Baking Blend
  • 4 teaspoons ground ginger
  • 4 teaspoons ground cinnamon
  • 1 1/2 teaspoons ground cloves
  • 1 teaspoon finely ground pepper
  • 1 1/2 teaspoons coarse salt
  • 2 large eggs
  • 1 cup unsulfured molasses
  • Royal Icing
  • Sanding sugar, for decorating (optional)
  • Candy, for decorating (optional)

Directions

  1. Whisk together flour, baking soda, and baking powder in a large bowl. Set aside.
  2. Place butter and Truvia in the bowl of an electric mixer fitted with the paddle attachment, mix on medium speed until fluffy. Mix in spices and salt, then eggs and molasses. Reduce speed to low. Add flour mixture, mix until just combined. Divide dough into thirds, wrap each in plastic wrap. Refrigerate until cold, about 1 hour.
  3. Line baking sheets with nonstick baking mats; set aside. Roll out dough on a clean work surface to 1/4-inch thick. Using a 4-inch gingerbread man-shaped cookie cutter, cut out cookies, and place on a baking sheet, at least 1 inch apart. Refrigerate until cold, about 30 minutes.
  4. Preheat oven to 350 degrees. Bake cookies until crisp but not dark, 10 to 12 minutes. Let cool on sheets on wire rack.
  5. Using white icing in a squeeze bottle, decorate gingerbread men, as desired. While still wet, sprinkle with sanding sugar; let dry 10 minutes. Shake off excess sugar. Using additional icing, attach candy, using craft tweezers. Let dry completely 8 hours or overnight.  {Credit to Dani Fiori}

    Two of my loves: Trees and squirrels 
    Icing:
    Royal Icing
    1 Cup powdered sugar
    1 1/2 Tbsp milk
    1 tsp vanilla (I like to always add a little more :)
    The Gingerbread Hospital


Sunday, September 2, 2012

Oh Laura!

Guess what time it is!? COOKIE TIME! (My personal favorite time. Besides Jesus time. That's my most favorite favorite!)

You might be asking who Laura is, that my friend, would be THE Laura Bush. She is the one who graced this world with her cookie recipe: Texas Governor's Mansion Cowboy Cookies.

Quite the title eh?

Here it is! You have GOT to try these! Although I would advise you half the recipe unless you have want about 50 bazillion cookies...seriously. I had to freeze half the dough b/c I was overwhelmed with just half of the batter worth of cookies.


Laura Bush's Texas Governor's Mansion Cowboy Cookies
Yield: 50 bazillion ;)


3 cups flour
1 tbsp baking powder
1 tbsp baking soda
1 tbsp cinnamon
1 tsp salt
1 1/2 cups butter, at room temperature
1 1/2 cups sugar
1 1/2 cups brown sugar
3 eggs
1 tbsp vanilla
3 cups semisweet chocolate chips
3 cups old-fashioned rolled oats
2 cups sweetened coconut flakes
2 cups chopped pecans (8 oz) (optional - I omit)

Preheat oven to 350ºF.

In a large bowl, whisk together the flour, baking powder, baking soda, cinnamon, and salt. Set aside.

In a second bowl, beat the butter on medium speed until smooth. Add the sugar and brown sugar and beat for another 2 minutes. Add the eggs one at a time, beating well after each addition. Mix in the vanilla. 

Stir in the flour mixture, blending until just combined. Add the chips, oats, coconut, and pecans and stir until fully incorporated.

Drop by rounded tablespoon onto an ungreased baking sheet, making sure to allow plenty of room between cookies. Bake for 10-12 minutes or until the edges are set and golden brown. Allow the cookies to cool on the pan for 1-2 minutes before placing on a cooling rack.

Literally scrumptious!! NOW ENJOY!

Monday, October 10, 2011

So Easy a Pumpkin Could Do it!

In the spirit of fall, not of halloween (I dislike halloween, but that's another story!) I decided to make some pumpkin muffins! Granted, I was led to when I saw how easy this recipe was. I was highly skeptical that something so simple could really be delicious. Well, I stand corrected. THEY ARE DELICIOUS! And so easy a toddler can make them!

A friend found the recipe on the ever-so-addicting Pinterest. (You can follow me on Pinterest here.) P.S. I have limited myself to 10 min max a day on it because it is a bit too addicting. I realized how many other things I could have been doing, that are bit more worthwhile! Oops, did I just say that? yes. yes i did. I challenge you to limit yourself on Pinterest, or on the computer all together. Go for a walk, or here's a novel idea! Bake something! Ok. Preaching over. : )

Now to the Pumpkin! 

Ingredients:
1 box of Classic Yellow Cake Mix
1 15 oz can of Pumpkin Pie Mix
Yes, that is all. No eggs, water, oil, nada!
Mix together cake mix and pumpkin. 
Set oven to 325〫

I like to use an ice cream scoop, but when I do not have one around I use a small spoon.
Place dough by rounded spoonfuls into cupcake liners. Fill liners depending on the desired size of muffins. I like to fill them about 1/2 full, but this dough does not rise as much as other recipes so feel free to add a bit more than usual. 

(I apologize for the poor picture quality. I do not have the best lighting in my house at college :)

Bake muffins for 20-25 minutes. The muffins should bounce back when touched.

And there you have it! Delicious and perfect-for-fall Pumpkin muffins!  I like to top mine off with a sprinkle of powdered sugar. It gives them a sweet little touch.

So here's to scrumptious easy recipes! 
Happy baking!

Friday, July 15, 2011

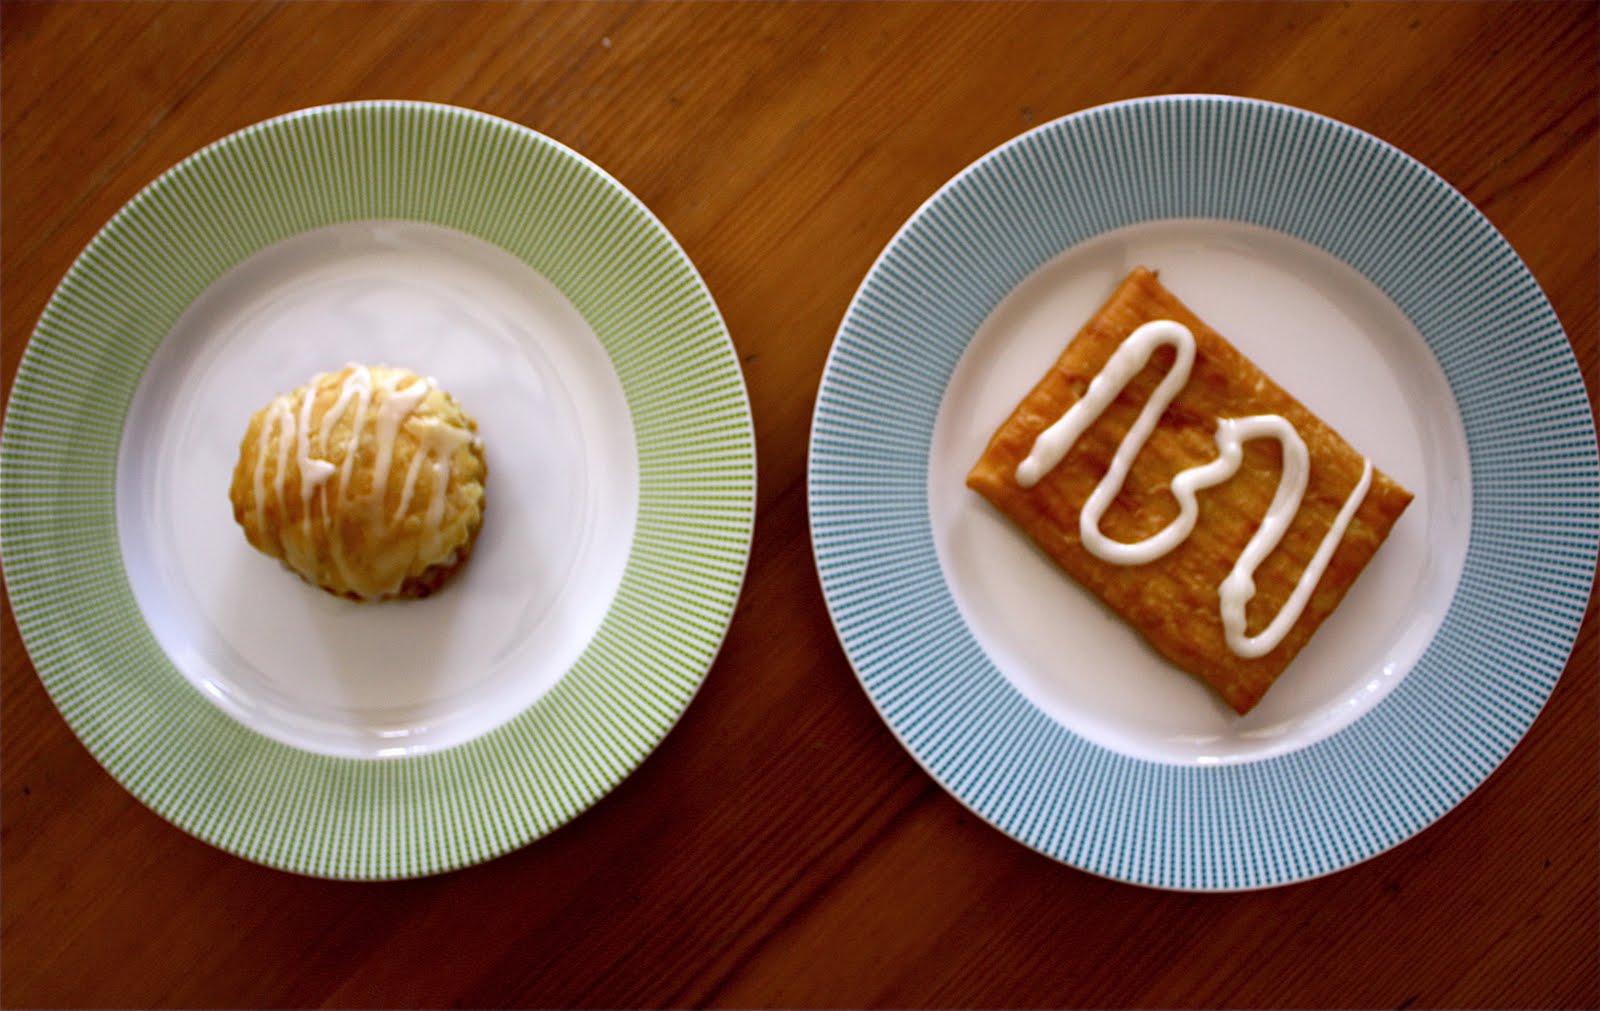
Would You Rather? Strawberry Toaster Style

So one morning I came down to find my brother pulling out the Pillsbury dough boy from the freezer...you can only imagine my horror to find out that my brother was eating a frozen pastry! Pre-packaged...fro...fro..FROZEN!!!! Ugh I can barely say it! So I immediately challenged him to give real pastries for breakfast a try. I was intent upon finding a REAL strawberry toaster pastry recipe..and I didn't have to look far. The Baking Fairy sent Williams-Sonoma to my aid. I was flipping through one of the magazines (one of my favorite) and low and behold..."Strawberry Toaster Pastry Recipe"!!! Ta-dow!

And so here begins the exciting experiment. Would you rather eat a Pillsbury's Strawberry Toaster Strudel or a Real Strawberry Toaster Pastry?

I tweeked the Williams-Sonoma recipe with what I had in regards to the cookie cutter, and it worked out fabulously.  All the directions and details you need to know can be found on their website on the link above. 
So you first cut the dough into the shape of the pastries using the cookie cutter. Then cover half of the pieces with chosen jelly, and add fresh fruit. Then you dab the edges of the pastries with the egg mixture and press around the edges to help keep the filling snug inside.
 Continue to cook them as the directed.
Now for the icing. YUM. You can make whatever pretty designs your heart desires. : )
Then we come to the first snag on the Toaster Strudel side.  I pulled out the icing and found it in this "lovely" plastic container. Ew. I don't know about you, but which icing would you rather drizzle your pastry with? I'll go with the fresh one thanks.

Now for the finished products. I tried to make the Strudel icing look elegant...but using that little squeeze plastic bag was a fail. I guess I need practice with it. On the other hand...I don't think I'll find myself using that icing ever again. 

Now for the first bites! I first tried my homemade pastry. Ok YUM! Delectable and scrumptious were my first two thoughts. The flaky outer layer melts in your mouth and the icing gives the sweetest compliment to the strawberry filling. Now for the toaster strudel...

Um...I'll just let the pictures speak for themselves. 

So I don't know about you, but if my brother and I have learned anything from this, we both now know that frozen never beats the real deal. Not even close. Hope you enjoyed the experiment.
 Conclusion: I would so much rather have a REAL strawberry toaster pastry. 

P.S. I had to spit out the toaster strudel. I couldn't do it. It was just too much ick for my mouth.
So please, save your taste buds and your arteries from the horror of frozen baked goods. 
Really. Don't do it. It isn't worth it. ; )
Happy baking!

Saturday, July 2, 2011

Patriotic Party

One of my favorite holidays is just two days away, and though I'm busy I couldn't help but notice so many wonderful ideas for this festive time of the year. With red, blue, and white everywhere you can't help but get in the mood. So if you're feelin' crafty and have some time this weekend, I found some super cute ideas for you to try!
The first comes from our dear Martha Stewart herself.  Her company is one of my absolute favorites. I saw this on the front of her latest magazine issue and just about died in the grocery store so thrilled by the idea. This is genius, and I wish so badly I had the chance to try it out, but hopefully next year! May I present to you Fireworks Cookies 
Courtesy MarthaStewart.com
They are based on the simple sugar cookie, but given pizzazz with simple icing that is watered down a bit to make it easier to decorate the fireworks with. These cookies will make any party exciting and will for sure be a huge hit with all your guests.

And who would I be if I didn't write about cupcakes? I found a wonderful blog by Winnie Abramson, where she applies the same method with cupcakes!  Firework Cupcakes Love it!

Courtesy Countryliving.com
Now for a simple, adorable craft idea that will brighten up your mantle, window, or door frame. It comes from Country Living Magazine (One of my favorites).                                  This garland can be made from simple construction paper and newspaper, or simply whatever paper you have.   The link shows you how to make it quick and easy! Happy 4th Garland
This idea can be applied for any holiday or celebration event. Everyone loves the little touches to decorations, and who says you have to go out and buy them! Making your own decorations is often alot cheaper, and usually are a bigger hit than any bought decor. : )

Hope you have a wonderful safe 4th of July!
Happy Fireworks!

Friday, June 3, 2011

Cream Puff Party!

These yummy treats were super easy to make! In fact you could make them in less than an hour! And the ingredients are simple too! I had been in the mood to make some sweet sugar cookies so I could have some fun decorating, but my little brother suggested we make his favorite treat, Cream Puffs!

I've never made them before so I was a little hesitant, but I thought why not!? So I was shocked to see how simple it is to make such delicious puffs!Here is the simple recipe!

Ingredients for Puff Pastry:
1 cup water
1/2 cup butter or margarine
1 cup all-purpose flour
4 eggs

Directions:
Step 1- Heat oven to 400ºF. In a saucepan, heat water and butter to rolling boil. Stir in flour; reduce heat to low. Stir vigorously over low heat about 1 minute or until mixture forms a ball; remove from heat. Beat in eggs, all at once; continue beating until smooth.
Step 2- On ungreased cookie sheet, drop dough by slightly less than 1/4 cupfuls about 3 inches apart. Bake 35 to 40 minutes or until puffed and golden. Cool away from draft, about 30 minutes.
Now we chose to go a more simple way with the cream part and just got a Whip Cream spray can at the grocery store. We cut a hole in the top of the pastry and insert the tip of the whip cream and squirt it into the pastry. It fills up the hollow space inside, but be careful because it does overflow if you put too much! And to top it all off we drizzled Hershey's Chocolate Syrupall over them! OH and don't forget the powdered sugar! Joe helped with the whole process also. ☺

These Cream Puffs are an easy quick make, and perfect for parties as you can make them as tiny or as big as you want. They are great bite size treats for any get-together. Hope you try them and enjoy them as much as my family did!

Saturday, May 28, 2011

Coca-Cola Cupcakes

It's been a while since I last blogged, still getting into the groove of summer time!✻

Well this week I got an itchin' to bake something. Something super sweet and scrumptious! And in popped my mind...I wonder what Coke Cupcakes would taste like! And here follows the answer of that question! THEY TASTE DELICIOUS!!!!! Probably the best chocolate cake recipe I've ever had in my life. And I'm proud to say I even improvised to make my very own icing! Which was heavenly, if I do say so myself. And because I believe that no 100% delicious recipe should ever go unshared, I have the recipe for you!

Coca-Cola Cupcakes

Ingredients:
2 cups of self-rising flour (or 2cups flour, 1 Tbsp baking powder, 1 tsp salt)
2 cups of sugar
2 tbsp cocoa (I used Hershey's cocoa)
1 cup Coca-Cola
2 sticks (8 ounces) butter, room temperature
1 1/2 cups miniature marshmallows
2 eggs, beaten
1/2 cup buttermilk
1 teaspoon baking soda
1 teaspoon vanilla extract

Now you can either make this a cake or cupcakes. I chose cupcakes because everyone knows they are just more fun! ☺ But depending on your choice you adjust the time you bake them. So for cupcakes I would adjust the time to about 15-20 min. You want the cupcakes to bounce back when you touch them.

Directions:
In a large bowl combine flour and sugar. In a saucpan combine the cocoa, Coca-Cola, butter, and marshmallows; bring to a boil. Combine the boiled mixture with the flour and sugar mixture.

In a separate bowl mix eggs, buttermilk, baking soda, and vanilla; add to the first mixture. Pour into prepared pan and bake at 350 degrees for about 35 minutes, until cake tests done.


Now for the icing. I used the basic classic buttercream frosting, but instead of using milk and vanilla I just used Coke! You just beat about 1/2 cup of butter and 2 cups of confectioners sugar together, and then add about 1/4 cup of coke. Also add some cocoa for chocolate Coke Icing. I can't really give you the exact recipe for the frosting because I just kinda did a little bit of this, little bit of that method. But it turned out delicious!!! The more coke you put in the frosting the runnier it will get, so it is always better to start with less, and add more if needed.


I hope you get a chance to try these because they are seriously scrumptious! Even Little Lu thought so! (Don't worry she didn't get to eat any, but she definitely liked the smell. We are puppy safe in this kitchen!)
If you ever find yourself with a little time to spare this summer, I would definitely encourage you to try these delectable treats because they will make your mouth water for more!! Happy summer!

Wednesday, March 16, 2011

Snickerdoodle Doo!

So you love snickerdoodle cookies? Well my friend, say hello to your new favorite little doodle. The Snickerdoodle Cupcake! These are super easy and wonderfully delicious! These little scrumptious cakes are topped with yummy Vanilla Buttercream Frosting. Here follows the recipes so you can enjoy these yourself!

Ingredients for cupcake:

1 1/2 cups all-purpose flour
1 1/2 tsp baking power
1/4 tsp salt
2 tsp cinnamon
1/2 cup unsalted butter, room temperature
1 cup sugar
2 eggs, room temperature
1 tsp vanilla
3/4 cup milk

Directions:
1. Preheat oven to 350 degrees
2. In a medium bowl, sift together flour, baking powder, salt, and cinnamon
3. In a mixer, cream butter and sugar on medium speed for about 2 minutes
4. Add eggs, one at a time and mix until combined
5. Add vanilla and mix throughly
6. Add flour mixture to creamed butter and sugar in three additions. Alternate with milk in two additions
7. Fill in baking cups about 3/4 full
8. Bake for about 15-20 minutes
9. Remove cupcakes from trays and let cool
10. Ice and sprinkle with brown sugar

Ingredients for frosting:
3 cups powdered sugar
1/3 cup stick margarine or butter, softened*
1 1/2 tsp vanilla
1 to 2 tbsp milk

Directions for frosting:
1. Mix powdered sugar and margarine in medium bowl.
2. Stir in vanilla and milk.
3. Beat until smooth and spreadable.

They are so easy and so delicious! I picked a simple frosting recipe because sometimes you just need a quick frosting, but don't want to resort to store bought (it just isn't the same!). These recipe is quick and makes about 24 cupcakes! I hope you enjoy these sweet treats as much as my family and I did!